HT16K33 Character Based Displays
The ht16k33_char display platform allows you to use a character display that is driven by a HT16k33 chip with ESPHome. Please note that this component is only for character displays. The chip is capable of driving arbitrary arrays of LEDs, but that configuration is not supported by this component.
This component supports scrolling messages and spanning the message across multiple displays. It is based on the excellent ht16k33-alpha library, but generalized for a wider range of character based devices.
Currently Supported Devices

See device details for more info on these devices and adding new devices for instructions on adding support for new devices.
| Device | Device ID(s) |
|---|---|
| Adafruit 1.2" 4-Digit 7-Segment | ADAFRUIT_7_SEG_1.2IN ADAFRUIT_7_SEG_1.2IN_FLIPPED |
| Adafruit 0.56" 4-Digit 7-Segment | ADAFRUIT_7_SEG_.56IN ADAFRUIT_7_SEG_.56IN_FLIPPED |
| Adafruit 0.54" 4-Digit 14-Segment | ADAFRUIT_14_SEG ADAFRUIT_14_SEG_FLIPPED |
| Sparkfun QUIIC 4-Digit 14-Segment | SPARKFUN_14_SEG SPARKFUN_14_SEG_FLIPPED |
Prerequisites
This component relies on the I²C Bus componenent to be setup.
Configuration Example
An example configuration YAML is shown below.
display:
- platform: ht16k33_char
device: ADAFRUIT_14_SEG
address: 0x71
buffer_size: 12
scroll: true
continuous: false
secondary_displays:
- address: 0x70
lambda: |-
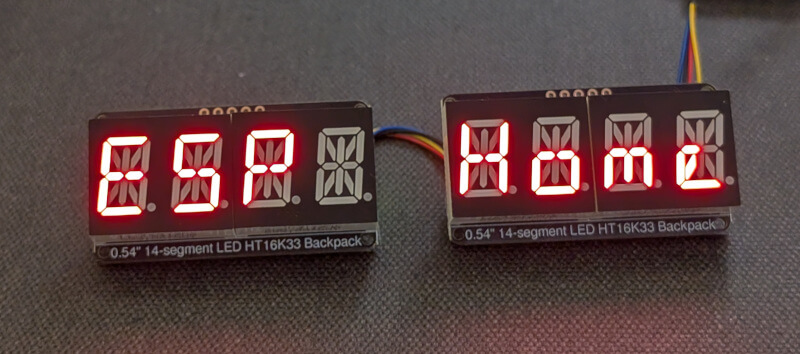
it.print(0, true, "ESP Home");Configuration variables
device (Required): The type of device attached.
- Choses the device type. Pick one of the options shown in the devices section.
address (Optional): The address of the base HT16k33.
- The i2c address of the display driver.
- If you have multiple display drivers, this should be the address of the first display.
- Defaults to
0x70
max_buffer_length (Optional): The maximum size of the character buffer. The length of this buffer is the longest message you can display.
- This should be, at minimum, the number of characters on the display you are using.
- You can make it longer if you want to scroll messages that are longer than the display can show all at once.
- If not set, it defaults to 8. Limited to 255.
brightness (Optional): Set the brightness of the display.
- Set the brightness of the display from 1 (dimmest) to 16 (brightest).
- If not set, it defaults to 15.
secondary_displays (Optional): Set to configure secondary displays.
- Use this to define other displays if you have more than one.
- Provide a list of i2c addresses for the secondary displays. The order of the list should match the order of how the displays are physically aligned. Eg: the first provided address will be the second device, the second provided with be the third device, etc…
scroll (Optional): Set to
trueto enable scrolling on the display(s). Will scroll the message in the buffer based on the following parameters.continuous (Optional):
- If set to
true, will loop the message in the buffer. - If set to
false, when the message reaches the end of the buffer, the display will wait a set time and then start the message over. - Defaults to
false
- If set to
scroll_speed (Optional): The time between the scroll movements.
- Defaults to
1s.
- Defaults to
scroll_delay (Optional): When not in continuous mode, the time to hold at the start of the message before starting to scroll (in seconds).
- Ignored in continuous mode.
- Defaults to
5s.
scroll_dwell (Optional): When not in continuous mode, the time to hold at the end of the message before restarting (in seconds).
- Ignored in continuous mode.
- Defaults to
2s.
If the buffer size is smaller than the number of characters available, the message will not scroll.
Defaults to
false
Using Lambda
The HT16k33-char component implements a simplified version of the lambda used in other displays. In the lambda you’re passed a variable called it as with all other displays. In this case however, it is the HT16k33 instance.
Commands available in lambda to place characters on the display
it.print(start_pos, clear_buffer, string): Prints a string to the buffer.- start_pos: The position in the buffer to place the string. Starts at 0 for the first position in the buffer.
- clear_buffer: Whether to clear the buffer before placing the message. Set to
trueto clear the buffer before adding the new message. - string: A char string of the message to place in the buffer. If the message is longer than the buffer, it will be truncated to fit.
it.print(clear_buffer, string): Prints a string to the start of the buffer.- clear_buffer: Whether to clear the buffer before placing the message. Set to
trueto clear the buffer before adding the new message. - string: A char string of the message to place in the buffer. If the message is longer than the buffer, it will be truncated to fit.
- clear_buffer: Whether to clear the buffer before placing the message. Set to
it.printf(start_pos, clear_buffer, <standard printf arguments>): Implements printf to place a formatted string into the buffer.- start_pos: The position in the buffer to place the string. Starts at 0 for the first position in the buffer.
- clear_buffer: Whether to clear the buffer before placing the message. Set to
trueto clear the buffer before adding the new message. - The rest of the arguments of this function will be passed to the printf function to generate a formatted string.
it.strftime(start_pos, clear_buffer, format, time): Generate a time string using strftime.- start_pos: The position in the buffer to place the string. Starts at 0 for the first position in the buffer.
- clear_buffer: Whether to clear the buffer before placing the message. Set to
trueto clear the buffer before adding the new message. - format: the formatting string expected by
strftime(). - time an ESPTime object of the time you want to display.
it.clock_display(start_pos, clear_buffer, show_leading_zero, use_am_pm, time): A simplified function that will display the time in the format HOUR:MINUTE.- start_pos: The position in the buffer to place the string. Starts at 0 for the first position in the buffer.
- clear_buffer: Whether to clear the buffer before placing the message. Set to
trueto clear the buffer before adding the new message. - show_leading_zero: Whether to show the leading 0 (for example in 01:30). Set to
trueto show the leading zero. - use_am_pm: Whether to use 12 or 24 hour time. Set to
trueto convert the time display to 12 hour mode. - time an ESPTime object of the time you want to display.
Other commands avaialable in lambda
it.brightness(value): Sets the display brightness tovalue. Must be between 0-16. Setting to zero turns off the display, setting to 16 is full brightness.it.blank(): Clears the display memory. This will turn off all digits. Not technically the same as turning off the device, but the result is the same.it.display_off(turn_off): Takes a boolean to turn the display on or off. Setturn_offtotrueto turn off the display.it.display_standby(standby): Takes a boolean to put the display in standby mode. Setstandbytotrueto place the display(s) into standby mode. This is probably a lower power state than just turning off the display, but I have not tested that.it.set_blink(blink_state): Set the blink state of the device. The HT16k33 is capable of blinking the display independently of the CPU. Valid values forblink_stateare:0: No blinking1: Blink rate of 2Hz2: Blink rate of 1Hz3: Blink rate of .5Hz- Any other value given to this function will turn off the blinking.
Please see Formatted Text for a quick introduction into the printf formatting rules and
Displaying Time for an introduction into the strftime time formatting.
Device details
Note that the only thing that is device specific is how the LEDs are wired to the driver chip. If you have another board that is wired the same way as one of the supported devices, you can use that device type and it should work fine.
A list of supported characters is given for each device. If you place a non-supported character in the buffer, the device will display a blank space when trying to display that character.
Adafruit 1.2" 4-Digit 7-Segment
Large 7 segment displays from Adafruit. They have various colors and all the colors should work the same. The wiring diagram for the device is here.
Both a right-side-up and upside-down version of this display is implemented here. To use them set device to ADAFRUIT_7_SEG_1.2IN or ADAFRUIT_7_SEG_1.2IN_FLIPPED.
I have implemented a subset of the most useful characters that display properly on a 7 segment display. There does not appear to be a standard for displaying other alphanumeric characters, and I did not implement some of the more esoteric character interpretations. If you need more characters, I suggest using a 14 character device or add your own characters.
Supported Characters
- All numerals (0-9)
- a blank space
AbCcdEFGHhIJLNO (Capital letter O)o (Lower case letter o)PrStUuY
Aside from the standard characters, this display also has:
A colon before the first digit. The two leds can be controlled independently.
- Use the character
'or ``` to light the upper LED. - Use the character
.to light the lower LED. - Use the character
:to light both LEDs.
- Use the character
A colon between digit 2 and 3. These two LEDs are wired together.
-Use the character
:to light these LEDs.A LED on the top side of the display between digits 3 and 4.
- Use the character
'or ``` to light this LED.
- Use the character
For the flipped version of this display, the ```, ', : and . characters work as expected if placed in the correct locations.
These characters must be placed in the correct position in the character buffer to turn on the relevant LED. If they are placed in any other position, they will be treated as an unsupported character.
Adafruit 0.56" 4-Digit 7-Segment
Small 7 segment displays from Adafruit. They have various colors and all the colors should work the same. The wiring diagram for the device is here.
Both a right-side-up and upside-down version of this display is implemented here. To use them set device to ADAFRUIT_7_SEG_.56IN or ADAFRUIT_7_SEG_.56IN_FLIPPED.
I have implemented a subset of the most useful characters that display properly on a 7 segment display. There does not appear to be and standard for displaying other alphanumeric characters, and I did not implement some of the more esoteric character interpretations. If you need more characters, I suggest using a 14 character device or add your own characters.
Supported Characters
- All numerals (0-9)
- a blank space
AbCcdEFGHhIJLNO (Capital letter O)o (Lower case letter o)PrStUuY
Aside from the standard characters, this display also has:
A decimal point after each digit
- Use the
.character to turn on a decimal point. - Note that if you are using the upside-down version of the display, use
'to light the decimal point that is now at the top of the display.
- Use the
A colon between digit 2 and 3. These two LEDs are wired together.
-Use the character
:to light these LEDs.Note that while it is technically possible to turn on both the decimal point after digit 2 and the colon after digit 2, I did not implement that in this code. If you try to do this, the first character you set will be displayed and the next one will be interpreted as an invalid character at position 3.
These characters must be placed in the correct position in the character buffer to turn on the relevant LED. If they are placed in any other position, they will be treated as an unsupported character.
Adafruit 0.54" 4-Digit 14-Segment
Small 14 segment displays from Adafruit. They have various colors and all the colors should work the same. The wiring diagram for the device is here.
Both a right-side-up and upside-down version of this display is implemented here. To use them set device to ADAFRUIT_14_SEG or ADAFRUIT_14_SEG_FLIPPED.
I have implemented most of the basic alphanumeric characters and punctuation. Some of them are a bit of a strech to display on these devices, but they are generally readable.
Supported Characters
- All upper case english characters (A-Z)
- All lower case english characters (a-z)
- All numerals (0-9)
- a blank space
!"#$%&'()*+,-/:;<=>?@[\]^_`{|}~
Aside from the standard characters, this display also has:
A decimal point after each digit
- Use the
.character to turn on a decimal point. - Note that if you are using the upside-down version of the display, I did not implement any way to light the decimal points that are now at the top of the display. The display itself is capable of displaying the
'character, so I did not figure it was worth it to also be able to light the decimal point. This could be changed in the future is anyone finds a use for those decimal points.
- Use the
These characters must be placed in the correct position in the character buffer to turn on the relevant LED. If they are placed in any other position, they will be treated as an unsupported character.
Sparkfun QUIIC 4-Digit 14-Segment
Small 14 segment displays from Sparkfun. They have various colors and all the colors should work the same. The wiring diagram for the device is here.
Both a right-side-up and upside-down version of this display is implemented here. To use them set device to SPARKFUN_14_SEG or SPARKFUN_14_SEG_FLIPPED.
I have implemented most of the basic alphanumeric characters and punctuation. Some of them are a bit of a strech to display on these devices, but they are generally readable.
Supported Characters:
- All upper case english characters (A-Z)
- All lower case english characters (a-z)
- All numerals (0-9)
- a blank space
!"#$%&'()*+,-/:;<=>?@[\]^_`{|}~
Aside from the standard characters, this display also has:
A colon between digit 1 and 2
A decimal point after digit 2
- Use the
.character to turn on the decimal point. - Note that if you are using the upside-down version of the display, I did not implement any way to light the decimal point that is now at the top of the display. The display itself is capable of displaying the
'character, so I did not figure it was worth it to also be able to light the decimal point. This could be changed in the future is anyone finds a use for this decimal point.
- Use the
These characters must be placed in the correct position in the character buffer to turn on the relevant LED. If they are placed in any other position, they will be treated as an unsupported character.
Adding or Modifying Characters
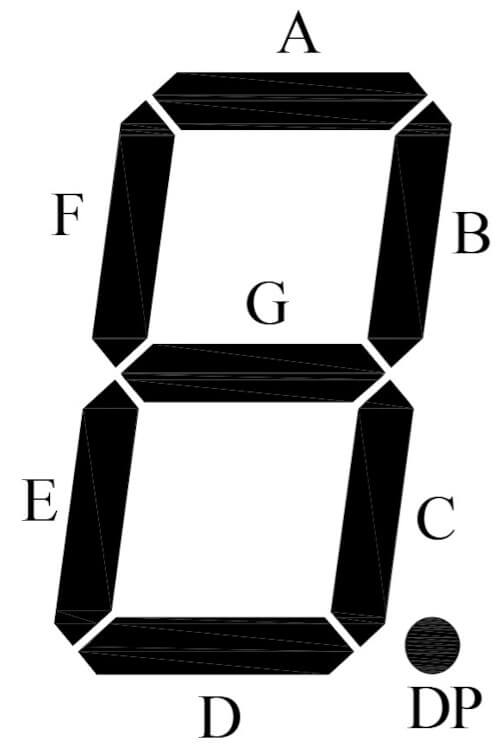
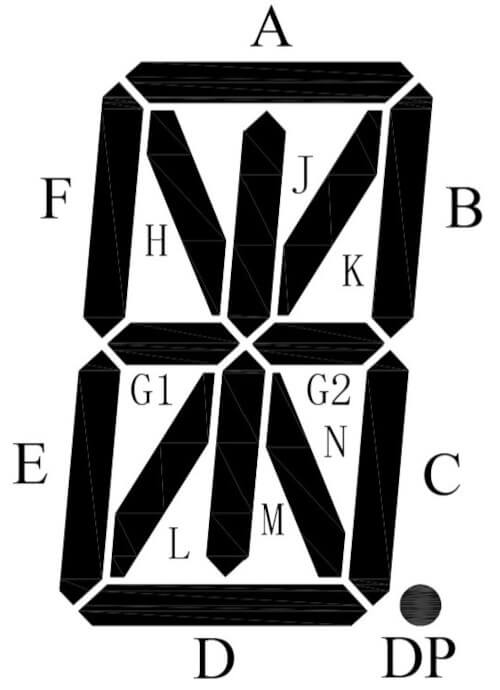
Characters can be added or modified from the standard font table. To do this, provide a add_characters section of the YAML. This config option should be provided a dictionary of character codes to add. The dictionary key names should be a single character and the key values should consist of a 16-bit number indicating which segments should be lit for that character. The definitions of the segments is given below.
 |  |
|---|---|
| 7 Segment Definitions | 14 Segment Definitions |
Each segment maps to a single bit in the character code as shown below. Note that bit 0 is the LSB of the code.
| Bit Number | 0 | 1 | 2 | 3 | 4 | 5 | 6 | 7 | 8 | 9 | 9 | 10 | 11 | 12 | 13 | 15 |
|---|---|---|---|---|---|---|---|---|---|---|---|---|---|---|---|---|
| 7-Segment | A | B | C | D | E | F | G | – | – | – | – | – | – | – | – | – |
| 14-Segment | A | B | C | D | E | F | G1 | G2 | H | J | K | L | M | N | – | – |
If the character to add is already in the character map, its code will be overwritten by the provided code. Note that the bit number that corresponds to the segments is the same regardless of the display type used. Internally the display may have a different mapping, but the python preprocessor rearranges the bits as needed.
Example:
In the below example, the E character is replaced with the code for R.
add_characters: { "E": 0b0010000011110011 }
Removing Characters
To remove a character from the map, include a remove_characters section in the YAML with a python list of characters to remove. These characters will be treated as invalid characters and will display as blank digits.
Example:
In the below example the characters E and F are removed.
remove_characters: ["E", "F"]
Adding New Devices
I tried to structure this library so that it would be (relatively) easy to add other devices. The basic steps to add a new device is:
- In
display.pymodify theHT16K33_DEVICE_TYPESdictionary to add a definition for your device:- They keys are what the user will put in the YAML file for the
devicesetting. - The
CLASS_NAMEvalues associated with those keys are the name of the associated class that you will define for this device. The name can be pretty much anything, but make it something unique and descriptive. - the
FORMAT_FUNCTIONshould take a character code in the standard format and return the correct formatting for your device.
- They keys are what the user will put in the YAML file for the
- In the
esphome\components\ht16k33_charfolder, add in a.cppand.hfile for your new device. The filename can be pretty much anything, but it is probably best to make it similar to your class name. This is where all the device specific magic happens.- Add the character codes to
char_map_during class initialization. - Set
num_chars_per_display_during initialization to the number of characters on the display. - Implement a
uint8_t handle_special_char(char char_to_find, uint8_t position)function. - Implement a
void write_to_buffer(uint16_t char_to_write, uint8_t char_position)function.
- Add the character codes to
- In this documentation, update the documentation to describe your added device.
Special Thanks
- ssieb and his ht16k33-alpha library that I borrowed heavily from.
- The authors and contributors for the MAX7219 component for providing an additional example.